Signed Distance Fields and their Implementation in Gazebo SITL
Signed Distance fields:
This representation is used for both mapping and planning in robotics. The entire volume is first divided into certain number of blocks called voxels (known as volumetric pixel). These voxels contain information such as their position, colour etc. In this work, 3D mapping is done using gazebo-sitl and iris drone with depth camera. For this purpose, Voxfield is used.
Truncated Signed Distance Field(TSDF)
This is used commonly in computer graphics for 3D map representation. This involves computing a 3D surface such as a mesh. Raycast, meaning, the emission of light ray from the sensor(like a depth camera such as Realsense D455) is done to hit the surface of the objects surrounding the drone. Then, for every voxel the SDF is calculated.
Projective TSDF:
In this, raycasting is done and the distance from the center of the sensor to the surface along the ray direction is calculated as SDF. This distance is truncated to have values very near the surface for better compression. This method is used in voxblox mapping but is considered as more error prone and less reliable than the non-projective tsdf.

where:
- pj: the coordinates of the point where the ray hits
- sk: coordinates of the point from where light is emitted from the sensor
- xi: coordinates of the center of the voxel in global reference frame
Non Projective TSDF:
In this, raycasting is done similar to that of the Projected TSDF. Here, the voxel TSDF gradient is calculated by taking the weighted average of the normals on the surface where the raycast hits. This gradient is then used to get the non projective TSDF. This method is used in voxfield. The math follows:
The following is for:
- i-th voxel Vi
- j-th point on the surface pj(measurement)
- at time k
Gradient Computation:
The non-projective SDF:
where:

and


Euclidean Signed Distance Field(ESDF)
This representation is used in for checking collisions and computing the collision costs in path planning. This involves computing clearance and direction to the nearest objects. In ESDFs, the distance of a voxel is computed as:
- For an occupied voxel, it is the distance to the nearest free voxel.
- For a free voxel, it is the distance to the nearest occupied voxel.
In general, the ESDFs of all the voxels in the map are calculated. If the SDF is:
- positive(+1), the voxel is within the obstacle
- negative(-1), the voxel is outside the obstacle
- zero(0), voxel is on the obstacle surface
So, this value is added to the cost which increases or decreases depending on the voxel location according to the sensor reading. This cost is then minimized for path planning purposes.
Implementation of 3D mapping using Voxfield:
Follow the steps to install the framework:
cd ~/Documents/ && mkdir -p voxfield_ws/src && cd voxfield_ws/src
cd ~/Documents/voxfield_ws && catkin build
cd ~/Documents/voxfield_ws
git clone https://github.com/VIS4ROB-lab/voxfield.git
wstool init . ./voxfield/voxfield_https.rosinstall
wstool update
cd ~/Documents/voxfield_ws
catkin build voxblox_ros
Next, we need to setup the camera module on the iris drone(this drone was used in this blog):
- Navigate to the launch files in the PX4-Autopilot repo(Assuming you have VSCode, else you can open it manually):
cd ~/Documents/PX4-Autopilot/src/PX4-Autopilot
code .
Change the following two files:
- ~/Documents/PX4-Autopilot/src/PX4-Autopilot/launch/mavros_posix_sitl.launch: Change line 16 to:
<arg name="sdf" default="$(find mavlink_sitl_gazebo)/models/iris_depth_camera/iris_depth_camera.sdf"/>
- ~/Documents/PX4-Autopilot/src/PX4-Autopilot/launch/posix_sitl.launch: Change line 16 to:
<arg name="sdf" default="$(find mavlink_sitl_gazebo)/models/iris_depth_camera/iris_depth_camera.sdf"/>
Open a new terminal and enter:
cd ~/Documents/PX4-Autopilot/src/PX4-Autopilot
source ~/Documents/mavros_ws/devel/setup.bash
source Tools/setup_gazebo.bash $(pwd) $(pwd)/build/px4_sitl_default
export ROS_PACKAGE_PATH=$ROS_PACKAGE_PATH:$(pwd)
export ROS_PACKAGE_PATH=$ROS_PACKAGE_PATH:$(pwd)/Tools/sitl_gazebo
roslaunch px4 mavros_posix_sitl.launch
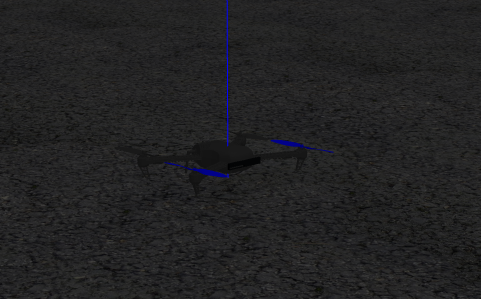
You should now be able to see iris with a depth camera in gazebo:
Next, navigate and the following in the voxfield workspace which you cloned previously:
- In the ~/Documents/voxfield_ws/src/voxfield/voxblox_ros/launch/voxfield_launch/:
- Create a new launch file in the code editor and name it as simulation.launch. Add the following code in that:
<?xml version="1.0" encoding="ISO-8859-15"?>
<launch>

<arg name="voxel_size" default="0.05"/>

<node name="voxblox_node" pkg="voxblox_ros" type="tsdf_server" output="screen" args="--alsologtostderr" clear_params="true">
    <remap from="pointcloud" to="/camera/depth/points"/>
    <param name="tsdf_voxel_size" value="$(arg voxel_size)" />
    <param name="tsdf_voxels_per_side" value="16" />
    <param name="voxel_carving_enabled" value="true" />
    <param name="color_mode" value="color" />
    <param name="use_tf_transforms" value="true" />
    <remap from="transform" to="body" />
    <param name="update_mesh_every_n_sec" value="0.05" />
    <param name="verbose" value="true" />
    <param name="method" value="fast" />
    <param name="min_time_between_msgs_sec" value="0.2" />
    <param name="max_ray_length_m" value="6.0" />
    <param name="world_frame" value="world"/>
    <param name="sensor_frame" value="camera_link"/>
    <param name="pointcloud_queue_size" value="10"/>
    <param name="publish_slices" value="true" />
    <param name="publish_pointclouds" value="true" />
    <param name="output_mesh_as_pcl_mesh" value="true"/>

    <rosparam file="$(find voxblox_ros)/cfg/d455.yaml"/>

</node>

<node pkg="tf" type="static_transform_publisher" name="tf_depth_camera"
          args="0.1 0 0 -1.57 0 -1.57 base_link camera_link 10"/>
<node pkg="voxblox_ros" type="map_baselink_pub.py" name="map_baselink_tfpub" output="screen"/>
<node pkg="voxblox_ros" type="waypoints_rvizinteract.py" name="setpoint_node" output="screen"/>

<node pkg="tf" type="static_transform_publisher" name="map_world"
          args="0 0 0 0 0 0 world map 10"/>

<node name="rvizvisualisation" pkg="rviz" type="rviz" output="log" args="-d $(find voxblox_ros)/cfg/rviz/kitti_25cm.rviz" />

</launch>
The above when launched will do the following:
- It will run the ros node called voxblox_node with pointcloud topic as “/camera/depth/points” and sensor frame “camera_link”.
- It creates a static transform between map and world with no translation and rotation between both the frames.
- It will open the rviz file(kitti_25cm.rviz) the configuration of which is already provided in the voxfield framework.
- It will run the nodes in the files:
- map_baselink_pub.py: this publishes the dynamic transform between the map frame and the baselink frame using the tf broadcaster object.
- waypoints_rvizinteract.py: this allows to provide the waypoint to the drone directly with the rviz ‘Nav 2D’ interaction tool.
Next, create a folder in voxblox_ros package and name it as scripts. In it, add two files:
- map_baselink_pub.py
- waypoints_rvizinteract.py
The code for these files are as follows:
- map_baselink_pub.py:
#!/usr/bin/env python3
# ROS python API
import rospy
from nav_msgs.msg import Odometry
import tf
from geometry_msgs.msg import Transform

# import all mavros messages
from mavros_msgs.msg import *

import numpy as np

def odom_cb(msg):
    br.sendTransform((msg.pose.pose.position.x,msg.pose.pose.position.y,msg.pose.pose.position.z),(msg.pose.pose.orientation.x,msg.pose.pose.orientation.y,msg.pose.pose.orientation.z,msg.pose.pose.orientation.w),msg.header.stamp,"base_link","map")

# Main function
def main():
    rospy.init_node('map_baselink_tfpub', anonymous=True)
    rate = rospy.Rate(50)
    rospy.Subscriber('mavros/local_position/odom',Odometry,callback=odom_cb)
    rospy.spin()

if __name__ == '__main__':
    try:
        br = tf.TransformBroadcaster()
        main()
    except rospy.ROSInterruptException:
        pass
- waypoints_rvizinteract.py:
#!/usr/bin/env python3
# ROS python API
import rospy

# 3D point & Stamped Pose msgs
from geometry_msgs.msg import Point, PoseStamped
from nav_msgs.msg import Odometry

# import all mavros messages and services
from mavros_msgs.msg import *
from mavros_msgs.srv import *
import numpy as np

# Flight modes class
# Flight modes are activated using ROS services
class fcuModes:
    def __init__(self):
        pass

    def setTakeoff(self):
        rospy.wait_for_service('mavros/cmd/takeoff')
        try:
            takeoffService = rospy.ServiceProxy('mavros/cmd/takeoff', mavros_msgs.srv.CommandTOL)
            takeoffService(altitude = 3)
        except rospy.ServiceException as e:
            print("Service takeoff call failed: ,%s")%e

    def setArm(self):
        rospy.wait_for_service('mavros/cmd/arming')
        try:
            armService = rospy.ServiceProxy('mavros/cmd/arming', mavros_msgs.srv.CommandBool)
            armService(True)
        except rospy.ServiceException as e:
            print("Service arming call failed: %s")%e

    def setDisarm(self):
        rospy.wait_for_service('mavros/cmd/arming')
        try:
            armService = rospy.ServiceProxy('mavros/cmd/arming', mavros_msgs.srv.CommandBool)
            armService(False)
        except rospy.ServiceException as e:
            print("Service disarming call failed: %s")%e

    def setStabilizedMode(self):
        rospy.wait_for_service('mavros/set_mode')
        try:
            flightModeService = rospy.ServiceProxy('mavros/set_mode', mavros_msgs.srv.SetMode)
            flightModeService(custom_mode='STABILIZED')
        except rospy.ServiceException as e:
            print("service set_mode call failed: %s. Stabilized Mode could not be set.")%e

    def setOffboardMode(self):
        rospy.wait_for_service('mavros/set_mode')
        try:
            flightModeService = rospy.ServiceProxy('mavros/set_mode', mavros_msgs.srv.SetMode)
            flightModeService(custom_mode='OFFBOARD')
        except rospy.ServiceException as e:
            print("service set_mode call failed: %s. Offboard Mode could not be set.")%e

    def setAltitudeMode(self):
        rospy.wait_for_service('mavros/set_mode')
        try:
            flightModeService = rospy.ServiceProxy('mavros/set_mode', mavros_msgs.srv.SetMode)
            flightModeService(custom_mode='ALTCTL')
        except rospy.ServiceException as e:
            print("service set_mode call failed: %s. Altitude Mode could not be set.")%e

    def setPositionMode(self):
        rospy.wait_for_service('mavros/set_mode')
        try:
            flightModeService = rospy.ServiceProxy('mavros/set_mode', mavros_msgs.srv.SetMode)
            flightModeService(custom_mode='POSCTL')
        except rospy.ServiceException as e:
            print("service set_mode call failed: %s. Position Mode could not be set.")%e

    def setAutoLandMode(self):
        rospy.wait_for_service('mavros/set_mode')
        try:
            flightModeService = rospy.ServiceProxy('mavros/set_mode', mavros_msgs.srv.SetMode)
            flightModeService(custom_mode='AUTO.LAND')
        except rospy.ServiceException as e:
               print("service set_mode call failed: %s. Autoland Mode could not be set.")%e

class Controller:
    # initialization method
    def __init__(self):
        # Drone state
        self.state = State()
        # Instantiate a setpoints message
        self.sp = PoseStamped()

        self.STEP_SIZE = 2.0
        # Fence. We will assume a square fence for now
        self.FENCE_LIMIT = 5.0

        # A Message for the current local position of the drone

        # initial values for setpoints
        self.sp.pose.position.x = 0.0
        self.sp.pose.position.y = 0.0
        self.ALT_SP = 1.0
        self.sp.pose.position.z = self.ALT_SP
        self.local_pos = Point(0.0, 0.0, self.ALT_SP)

        # self.sv.twist.linear

        # speed of the drone is set using MPC_XY_CRUISE parameter in MAVLink
        # using QGroundControl. By default it is 5 m/s.

    def get_quaternion_from_euler(self, roll, pitch, yaw):
        """
        Convert an Euler angle to a quaternion.

        Input
            :param roll: The roll (rotation around x-axis) angle in radians.
            :param pitch: The pitch (rotation around y-axis) angle in radians.
            :param yaw: The yaw (rotation around z-axis) angle in radians.

        Output
            :return qx, qy, qz, qw: The orientation in quaternion [x,y,z,w] format
        """
        self.qx = np.sin(roll/2) * np.cos(pitch/2) * np.cos(yaw/2) - np.cos(roll/2) * np.sin(pitch/2) * np.sin(yaw/2)
        self.qy = np.cos(roll/2) * np.sin(pitch/2) * np.cos(yaw/2) + np.sin(roll/2) * np.cos(pitch/2) * np.sin(yaw/2)
        self.qz = np.cos(roll/2) * np.cos(pitch/2) * np.sin(yaw/2) - np.sin(roll/2) * np.sin(pitch/2) * np.cos(yaw/2)
        self.qw = np.cos(roll/2) * np.cos(pitch/2) * np.cos(yaw/2) + np.sin(roll/2) * np.sin(pitch/2) * np.sin(yaw/2)
        # print(self.qx, self.qy, self.qz, self.qw)

        return [self.qx, self.qy, self.qz, self.qw]

    # Callbacks

    ## local position callback
    def posCb(self, msg):
        self.local_pos.x = msg.pose.position.x
        self.local_pos.y = msg.pose.position.y
        self.local_pos.z = msg.pose.position.z

    ## Drone State callback
    def stateCb(self, msg):
        self.state = msg

    def goal_cb(self,msg):
        self.sp.pose.position.x = msg.pose.position.x
        self.sp.pose.position.y = msg.pose.position.y

        self.sp.pose.orientation.x = msg.pose.orientation.x
        self.sp.pose.orientation.y = msg.pose.orientation.y
        self.sp.pose.orientation.z = msg.pose.orientation.z
        self.sp.pose.orientation.w = msg.pose.orientation.w

    ## Update setpoint message
    def updateSp(self):
        self.sp.pose.position.x = self.local_pos.x
        self.sp.pose.position.y = self.local_pos.y
        self.sp.pose.position.z = self.local_pos.z

# Main function
def main():
    rospy.init_node('setpoint_node', anonymous=True)
    modes = fcuModes()  #flight modes
    cnt = Controller()  # controller object
    rate = rospy.Rate(50)
    rospy.Subscriber('mavros/state', State, cnt.stateCb)
    rospy.Subscriber('mavros/local_position/pose', PoseStamped, cnt.posCb)
    rospy.Subscriber('/move_base_simple/goal',PoseStamped,cnt.goal_cb)

    sp_pub = rospy.Publisher('/mavros/setpoint_position/local', PoseStamped, queue_size=10)
    # Setpoint publisher
    movement_cmd = AttitudeTarget()
    thrust_pub = rospy.Publisher('mavros/setpoint_raw/attitude', AttitudeTarget, queue_size=1)

    while (cnt.state.armed == 0):
        modes.setArm()
        rate.sleep()
        print("ARMING")

    cnt.sp.pose.position.x = 0
    cnt.sp.pose.position.y = 0
    cnt.sp.pose.position.z = 0.5

    cnt.sp.pose.orientation.x = 0
    cnt.sp.pose.orientation.y = 0
    cnt.sp.pose.orientation.z = 0
    cnt.sp.pose.orientation.w = -1

    sp_pub.publish(cnt.sp)
    rate.sleep()

    modes.setOffboardMode()
    print("---------")
    print("OFFBOARD")
    print("---------")

    # ROS main loop
    while not rospy.is_shutdown():
        sp_pub.publish(cnt.sp)
        rate.sleep()

if __name__ == '__main__':
    try:
        main()
    except rospy.ROSInterruptException:
        pass
Finally, in two new terminals, launch the following:
- Terminal 1: Start gazebo with iris-depth_camera in it.
- Terminal 2: Launch the simulation.launch:
cd ~/Documents/voxfield_ws
source devel/setup.bash
roscd voxblox_ros/scripts
chmod +x map_baselink_pub.py
chmod +x waypoints_rvizinteract.py
roslaunch voxblox_ros simulation.launch
Now, the mapping framework starts and we will be able to send pose commands to the drone using the Rviz Nav 2D Goal interaction tool.
- Place few obstacles around the drone in gazebo.
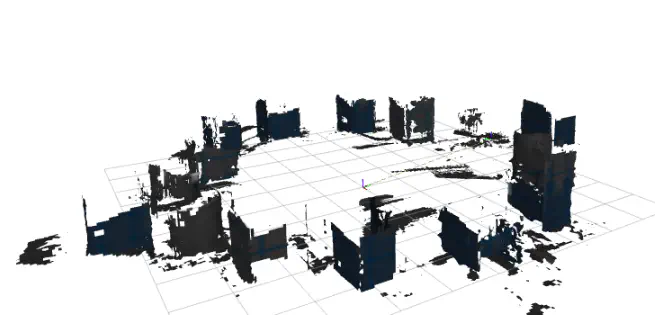
- In Rviz, use the Nav 2D Goal arrow to give waypoints to the drone and move it around until it generates a 3D mesh of the world. This process is time taking since we need to expose the drone’s camera to different field of views at every waypoint and wait until that region is mapped.
I got the following results:
Video:
Shiva Rudra Lolla
Robotics Researcher
My research interests include autonomous systems and perception. Drop me a message if you want to connect!